Balancing Flash with Ambient Light

How do you combine flash with ambient lighting to balance foreground and background exposure in a scene? Jim Zuckerman covers the metering modes, camera settings, and processes that will give you creative control.
In many situations, automatic exposure systems in modern cameras work quite well. One of the areas in which I’ve seen an impressive improvement in exposure is balancing a flash with ambient light. Most photographers find this to be challenging, and therefore the camera’s ability to expose correctly for both the flashed subject and the environment comes as a welcome relief.
The problem, of course, is that when you use a camera’s automation you lose control. It’s very easy to be seduced by an “intelligent” camera that seems to solve problems for you, and then find that the results aren’t exactly what you wanted when you examine them on your monitor. Too often, they are downright disappointing. To be a master of the medium is to be successful photographer. There are so many photographic and lighting scenarios that if you rely on how strobes and camera equipment are programmed you will not be happy with how they expose your pictures at least some of the time. Who wants to lose great images because you didn’t take the time to learn how to read light accurately?
Handheld meters have three functions: reflected mode, incident mode, and flash mode. In the hands of a knowledgeable photographer who knows how to use these modes correctly, any kind of exposure situation is not a challenge. When you are metering a mixed lighting setup where a flash is used in combination with ambient light, you have to use two of the modes on your handheld meter. Flash mode is used to read the brief burst of light from a portable flash or studio strobes, and incident or reflected mode is used to read the ambient light. Handheld meters read light in tenths of an f-stop, and therefore you can be very precise in measuring the ratio between flash and ambient light levels.
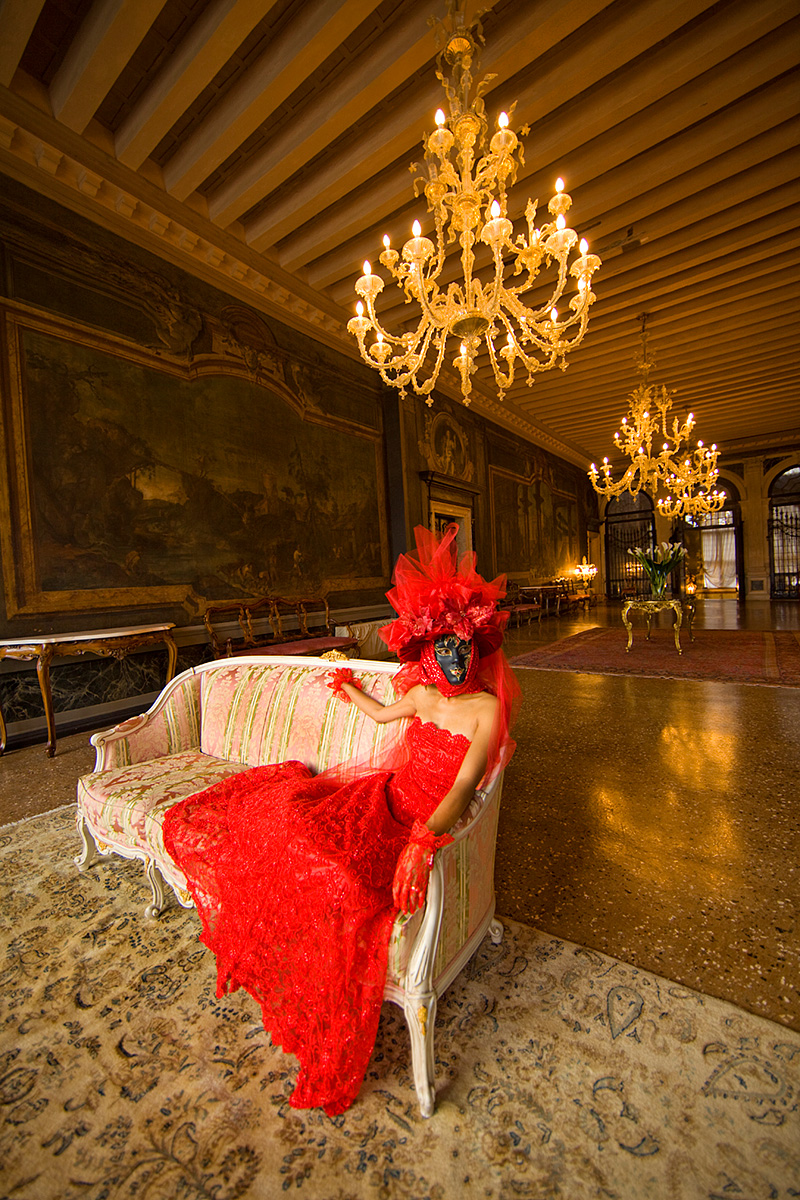
For example, I photographed a costumed model in a 17th century palace in Venice, Italy (below). The room in which we were shooting was huge, and I lit the model with off-camera flash (a Canon Speedlite 580EX) while tungsten bulbs and window light illuminated the back of the room. To calculate a perfect exposure, I needed to take two readings. First, I took a reflected reading on the background. I selected an area of the room that I felt represented middle tone and metered it in spot mode. I got 1/30th second at f/5.6 with ISO 400.

Next, with the handheld meter switched to incident mode, I had an assistant hold the meter next to the model’s masked face and point its white dome at the camera. I triggered the flash manually with the test button, and meter’s LCD gave me a reading of f/11 (shutter speed isn’t figured into flash exposures). That meant there was too much light, because I wanted to shoot at f/5.6. Therefore, I cut down the power on the flash by two f-stops and did the test again to be sure I was right on. The meter now indicated that f/5.6 would give me the correct exposure for the model.
So, now the light on the model was the same as on the background. However, I wanted the background to be more muted than the foreground, so I used a shutter speed of 1/125 second for the picture. This underexposed the background by one f-stop, which is what you see here, but the exposure on the model remained correct. Why? The reason is that the meter reading for the background was for the ambient light. The flash was too far away to affect the rear portion of the cavernous room, and therefore the exposure for the background was entirely dependent on the f-stop / shutter speed combination.
For the exposure of the foreground, though, the lighting came from the flash only. Therefore, changing the shutter speed didn’t affect the exposure of the subject, since the speed of light is faster than any shutter speed. It was only the amount of light let into the lens through the aperture that determined the exposure.
Relying on an automatic metering system never gives you this kind of control.
Visit Jim online to see his work, online courses, photo workshops, photo tours, and more!
All text and images in this article are © Jim Zuckerman.