White-Line and Black-Line Lighting

Dr. Glenn Rand demonstrates how to use lights, reflectors, flags, and mirrors to create precisely controlled shots of glass objects in this excerpt from his Amherst Media book Lighting and Photographing Transparent and Translucent Surfaces.
This excerpt from Lighting and Photographing Transparent and Translucent Surfaces is provided courtesy of Amherst Media. To purchase the book and learn more about the publisher, visit the Amherst Media Web site.
Reflection and transmission of light create the major lighting styles for glass. Though the effects of lighting glass may be seen in all areas of the glass, the two major forms of lighting glass—white-line and black-line lighting—are defined by the way the light is seen at the edge of the glass. It can be argued that all lighting of glass is one of these two types of lighting, or a combination of both.
If there is a bright light on the side and/or on the surfaces of the glass subject closest to the camera, then the lighting is known as a white-line lighting pattern. When the light passes through the glass, some of its intensity is absorbed by the glass, and there are no reflections on the camera-facing surfaces, a black-line lighting pattern is created. White-line and black-line lighting are seldom pure. Normally, part of the lighting will have one characteristic and other portions will reverse.
The two forms of lighting glass can provide different information about the glass. With attention paid to the edges of the glass, both give good definition of shape. The contour of the glass is the most important quality in defining the subject. Since both white-line and black-line techniques can render good contour, neither is superior for that use. There are, however, two critical differences in the way the lighting looks and how we can use it to meet our needs. We’ll address these in “Determining the Proper Approach.”
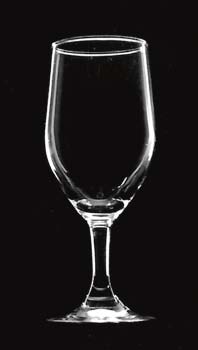
White-line lighting is based on reflections. Understanding the concepts involving reflections allows us to place varying amounts of reflection on specific parts of the surface of the glass, helping to show the volume and form of the glass.
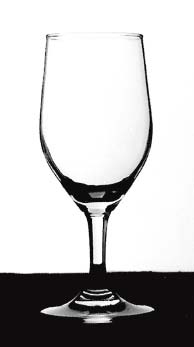
Black-line lighting exists because the light is transmitting through the glass. Because it absorbs portions of the light, the glass acts as a filter, showing the color, density, and thickness of the glass. Unlike a white-line lighting pattern, a black-line pattern tends to flatten the visual space within the glass.
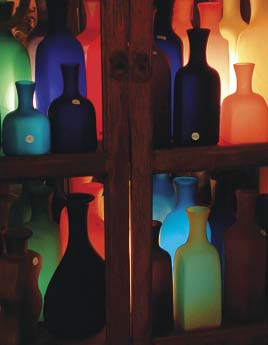
David Ruderman used pure black-line lighting to show the unique color of each bottle.

In this image, the concept is to show the various tones of each beer. To do this, a black-line lighting pattern was created by backlighting the glasses. The reflection from the waxed table projects the light up through the glasses toward the camera. Photograph by Joe Lavine.
Creating White-Line and Black-Line Images
There is only one controlling factor in determining which type of lighting shows on any portion of the glass—the background. A white-line effect is achieved when the reflection on the glass is brighter than the background. A black-line effect is achieved when the background is brighter than the reflections on the glass. In this case, the lighting pattern will show color, tone, and density. Note that “background” refers not only to a fabric or paper used behind the subject, but to any area to the rear of the glass or objects that can be seen behind the glass. It also refers to the amount of the light in the background, and not just the absolute reflectivity of the materials that appear in the image. If a white object behind the glass is unlit, then it is likely that white-line lighting will occur; a dark background with bright lighting may well create a black-line lighting effect.
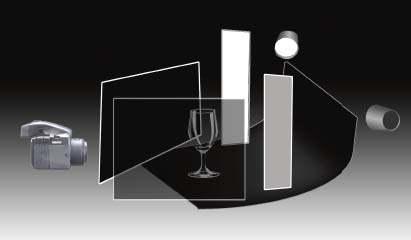
A classic white-line image is created by placing a vertical fill card on either side and to the rear of the glass. Each card is separately lit, controlling the light so that none of the light shines directly on the glass. The farther back the cards are from the glass and the closer to tangent with the surface of the glass and the line from the camera to the cards, the closer the lines will appear to the edges of the glass. The narrower the cards and the farther they are from the glass, the thinner the line will appear. The intensity of the light on each card will change the intensity of the reflected line, and even if only one card is used, the internal reflections will make it appear that there are lines on both sides of the glass.
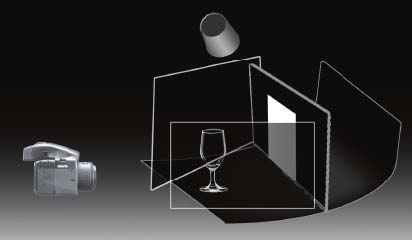
Creating a tight and dark light envelope with only a diffuse light surface directly behind the glass creates basic black-line images. If the lit panel receives light from the front, the light should be controlled to prevent direct light from shining on the glass. If the lit panel is too wide, it will create white lines on the edges of the glass and can cause added lens flare. To reduce reflections from the front surfaces, black matte cards (flags) are positioned to allow only a small space for the camera to view inside the light envelope. The exposure for black-line images is critical because the camera is facing a light source. If there is overexposure, the tone created by the density of the glass will be lost, and the dark lines on the edges will be weak.
Determining the Proper Approach
The lighting approach that will work best for your glass subject depends upon its qualities and features. As a general guideline, remember that white-line reflective effects on the subject’s outer surfaces can provide visual clues that help the viewer perceive the volume of the glass. In black-line lighting, light passing through the glass gives a good indication of outside contours and emphasizes colors or densities of the glass or transparent/translucent materials. By compositing two images of your subject—one taken using the white-line technique, one taken with the black-line technique—you can reap the benefits of both approaches and maximize your images. Though it can be accomplished with film, compositing images using an image-editing program’s layers feature simplifies the task. (This will be discussed in chapter 7.)
Case Studies
For the following examples the same basic subject arrangement has been used. This will allow the comparison of the difference between white- and black-line lighting. In each photo session, the primary consideration is the color of the glass. A white-line lighting pattern was used to photograph a clear glass, and a black-line approach was used to photograph a glass with a light colorant.
White Line. This example uses classic white-line lighting to accent the shape, volume, and the sandblasted decoration of the glass. Since the glass has no colorant, using the white-line approach will make the glass look clearer and cleaner. Adding a flower to the scene adds complexity since, if we are to add light on the camera side of the flower, we cannot use the same lighting that will be applied to the glass. Also, when light is applied to the flower, it can be difficult to keep specular reflections from appearing on the glass.
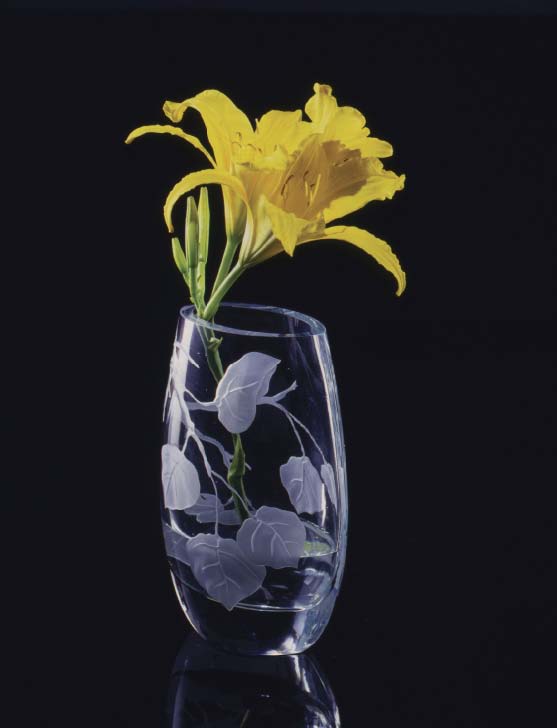
This photograph shows the classic white-line approach with a flower in the glass vase. The sandblasted design on the vase is a diffuse surface and therefore will spread and scatter the light in the light envelope to the camera. Glass used for this photograph was by Mary Marshall of Crystal Glass Studio in Carbondale, CO.


A white-line approach helped to define the shape of the vase and put light into the sandblasted areas while maintaining the contrast in these areas. Black Plexiglas was used to give a reflection of the glass toward the camera and to allow reflection of the lighting controls into the glass from below the glass. This allows for the white line to wrap around the bottom curve of the vase. A black background was used behind the subject to prevent unwanted highlights from appearing in the glass.
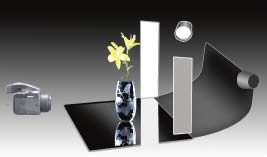
The classic white-line lighting was created using tall, thin fill cards on each side of the glass. Each fill was positioned behind the glass in relation to the camera and lit with a spotlight that was controlled to avoid direct light reaching the vase. The left-side fill card was given more by positioning a light closer than a card. This created the differential in the light intensities on each side of the glass. Since the background is black and the vase is placed on black Plexiglas, the reflections (the white lines) in all parts are bright. The left-side highlight was metered using a spot meter. The aperture was opened up three stops, to set the reflection as white.
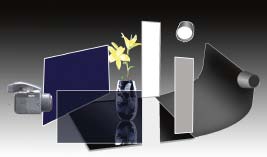
Flags were placed and angled away from the camera on both sides to keep reflections from appearing on the front surfaces of the vase.
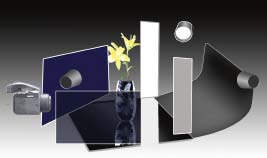
Finally, the flower was lit separately to prevent additional light from reaching the glass. The flag on the flower’s spotlight was used to focus light on the flower and keep it from falling on the vase. The spotlight on the flower was repositioned to equal the exposure needed to set the white lines. An incident meter was positioned at the flower and pointed at the spotlight used to illuminate the flower.
Black Line. The black-line lighting approach was used to accent the glass’s color, and specular highlights accented the textural decoration. As in the previous example, the flower adds a second level of complexity and will be handled in a similar manner as in the discussion of white-line lighting. Unlike the classic white-line example, specular highlights and surface reflections were added on the glass.
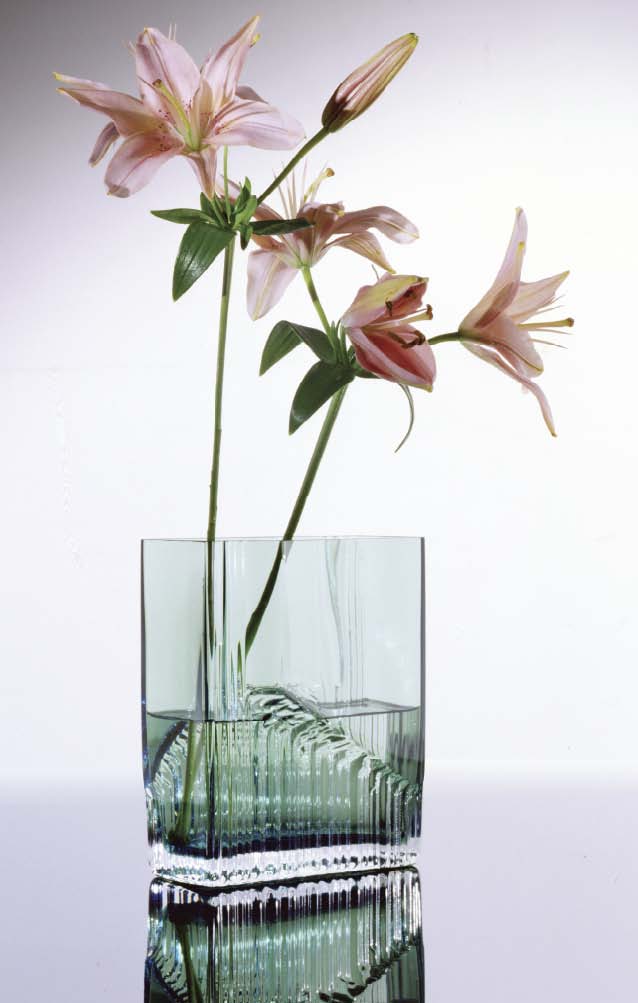
The black-line technique was used to show the color of the glass. The shape is defined by reflections on the flat surfaces, and accents were created with specular light. Photograph by Glenn Rand.
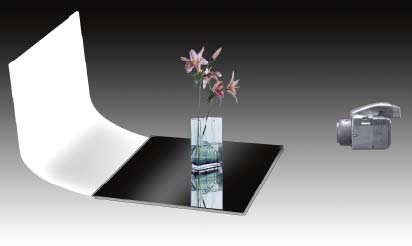
The overall black line effect is created by the large white surface behind the glass. For a consistent look, black Plexiglas was used here, as it was in the white-line example. The Plexiglas has a polished rear edge to soften the reflection and eliminate a sharp line. With limited depth of focus, the back edge will soften further. The camera is positioned low to move the line across the back into the patterned area of the glass.
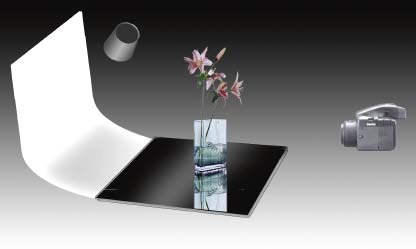
The background is brightly lit with falloff at the top ensuring even light behind the subject to create the overall black-line treatment of the glass. Exposure is determined by taking a spot meter reading through the glass and opening up one stop to give the glass a lighter tone. This will allow us to show controlled reflections, and specular accents allow the viewer to perceive density differences in the glass.
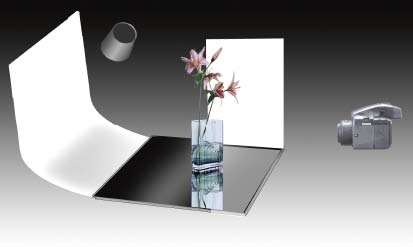
A large white fill card was positioned to reflect light into the left plane of the glass, and a spotlight was shone on the card. The intensity was adjusted to give a slight reflection on the glass that would not mask the color of the glass.
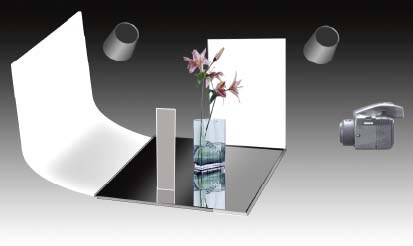
A tall, thin white card was placed on the right side to create a slight reflection. No additional light was used on this card. Without extra light on this card its intensity will be less than the large fill card on the left side of the set. Because this card is receiving less light, its reflection will be less powerful on the right side, accenting the corner shape of the glass.
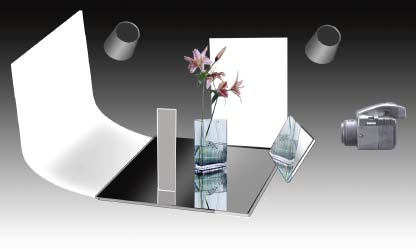
To produce the specular accents on the modeled portion of the glass, a mirror was placed in the beam of the spotlight on the left side of the set. The mirror was aimed upward so that the shadow pattern created by this light source would not be seen in the image. Because the surface of the glass catching the light from the mirror was flat, any light reflecting from the surface went to the ceiling above the set, not toward the camera.
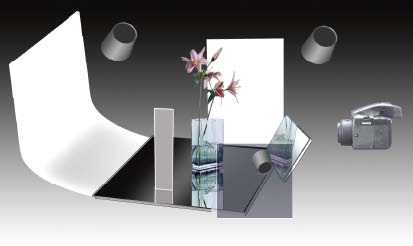
Here, a small spotlight was shown on the flowers. A gobo was used to ensure that no light from this spotlight would show on the glass. An incident light meter was used to measure the light at the flowers, and the light was moved to a distance to match the exposure for the black line.
Combining Line Effects. The photograph below illustrates the use of black-line technique to show the colored glass and white line, diffractions, and reflections to accent the edges of the fins of the glass fish to bring out the dichroic color of the fins.


Glass fish by Mary Marshall of Crystal Glass Studio in Carbondale, CO. Photograph by Glenn Rand and Mary Ehmann.
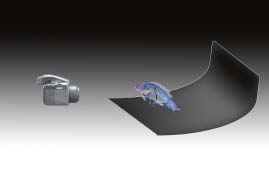
The photograph was made in a totally darkened studio. A dark-gray seamless backdrop was set up with about a sixfoot sweep from the subject to the vertical back.
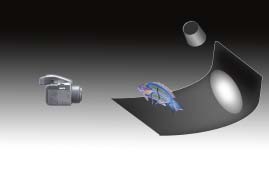
A spotlight was focused to form an oval of light on the background. The shape was controlled so that the top edge of the light pattern would fall off aligned with the fins’ shape. Even though the backdrop was dark gray, the intensity of the light was strong enough to record as very light gray during exposure. The light gray background light pattern will allow a black-line treatment for the colored glass. If the background were black, it would not allow enough reflection of the spotlight to see the color of the glass. If the background were white, the falloff would not be great enough to accent the edges of the fins.
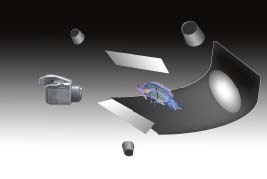
A spotlight was aimed at a long, white fill card above and in front of the glass fish. This reflected light off of the top fin, showing off its dichroic glass and creating front/top white-line effects. With the light pattern on the background aligned with the top edge of the glassware, it provided a strong white-line effect for the top fin. The spotlight was feathered to create falloff on the white card so that the card was brighter toward the rear of the fin. The varied light created better color in the dichroic glass. A second spotlight was aimed at another white fill card positioned below on the camera side of the glass. The card was positioned so that the light would be brighter and closer to the fish’s mouth. This was used to create reflections on the bottom details of the fish. Since the intensities of the reflections were brighter than the background light pattern, they show as white lines and reflect off the silvered mouth.
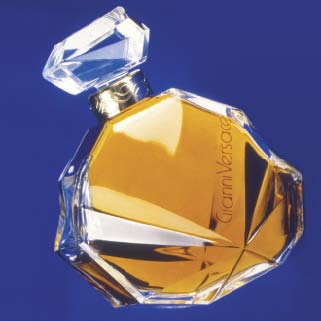
Bob Coscarelli produced this image using a common trick to accomplish the black-line effect for the color of the perfume and the white-line effect for the facets of the bottle and stopper. Gold foil cut to the shape of the bottle was placed between the bottle and blue background. The allowed light to reflect back through perfume, showing its color and creating the dark patterns. At the same time, the perfume and background are darker than the reflections on some of the facets of the bottle allowing the bright reflections.
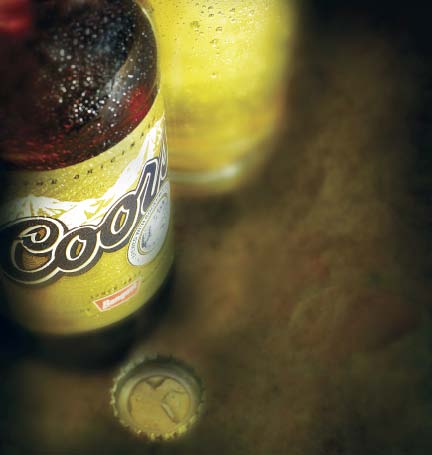
The glass at the rear of the image was backlit showing the color of the beverage. This is a black-line pattern. Front light was added to illuminate the label and to create a white-line effect on the condensation on the bottle. A small light was brought through the bottle, and because of the dark color of the glass, the glow in the bottle is weak. Photograph by Joe Lavine.
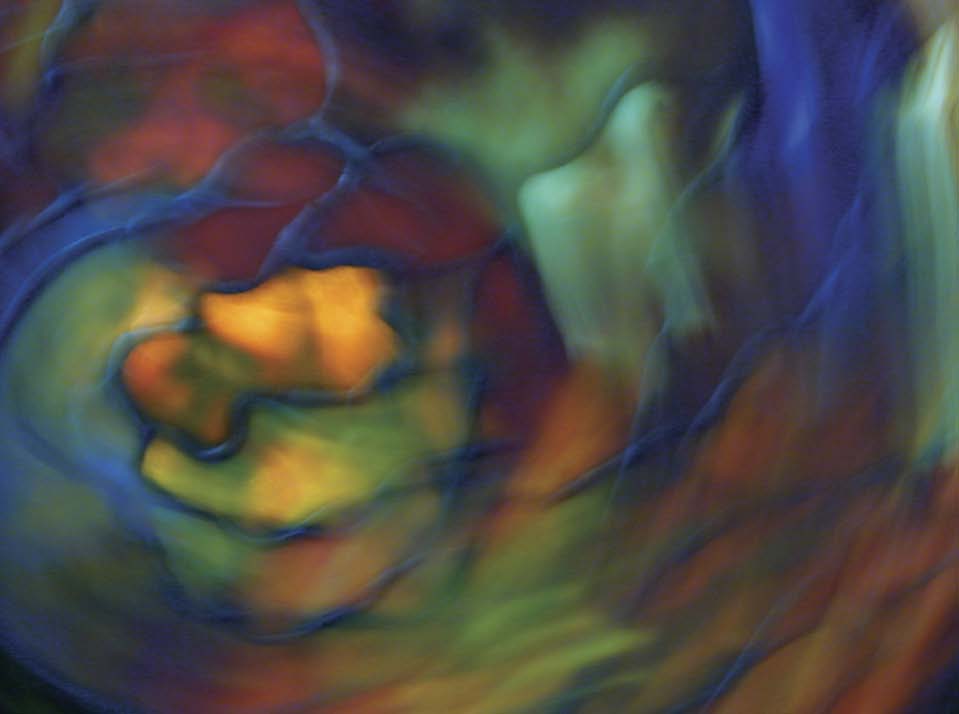
This approach uses a basic black-line technique with the Tiffany glass lit by a lightbulb from behind. Photograph by Douglas Dubler.